Youhouuu! {Panpan} revient avec un nouveau petit détail trop sympa pour votre mariage.
#Chronique2 si vous n’avez pas lu la précédente #Chronique1 ici

Le premier petit détail de 2015 … vos initiales illuminées !!
Votre grand jour, vous l’avez longtemps imaginé ou vous commencez juste à y réfléchir ? Que vous cherchiez à créer une ambiance romantique ou complètement bling-bling, j’ai trouvé LE petit détail à la fois magique et féérique, la petite touche qui ravira petits et grands … vos initiales illuminées !
Elles peuvent être installées dans les jardins, pour de belles photos à la tombée du jour ; elles peuvent même être installées pour que vos invités puissent en profiter avec de petits accessoires (lunettes, chapeaux, moustaches, faites vous plaisir !) pour un photocall de folie, unique, dont vous et vos proches se souviendrons longtemps !
Et ce n’est pas tout … Si vous avez le temps et l’envie, vous pouvez décliner ces belles lettres illuminées en indications des lieux « temps fort » de votre grand jour : pourquoi pas écrire le mot « Bar » près des boissons ? ou « Oui » près de votre lieu de cérémonie ? ou « Dance » près du lieu pour vous et votre prince charmant ouvrirez votre bal ? Laissez libre court à votre imagination !
The first little detail of 2015 … your lighted initials !!
Your big day is approaching, you have been imagining it for years, or are just starting to think it through? Whether you are looking into creating a romantic atmosphere or a crazy bling one, I got THE little detail, both magical and fairy, the little touch that will delight the younger and older guests … the lighted letters ! Aka marquee letters.
They can be installed in the gardens for beautiful pictures at dusk; they can even be installed for your guests to enjoy with small accessories (glasses, hats, mustaches, enjoy!) for a crazy and unique photo call that you and your family will long remember!
And that’s not all … If you have the time and dedication, you can decline these beautiful letters into illuminated signs pointing at the “key places” of your big day why not write the word « Bar » near the drinks? or « Yes! » near your ceremony? or « Dance » near the place for you and your prince charming will open your ball? Unleash your imagination!

Source : Refinery29
La bonne nouvelle !!!
La bonne nouvelle ? Ça n’est pas très cher à faire, par contre, il faut un peu de temps et on ne s’improvise pas bricoleur du jour au lendemain. Allez faire un petit tour sur Etsy et vous pouvez commander vos lettres toutes faites, pour un certain budget (compter environ $45/lettre).
Cependant … votre cher et tendre veut s’investir dans l’organisation du grand jour, mais choisir le papier du faire-part ou la couleur des chemins de table ne l’inspire pas vraiment ? C’est aussi le projet idéal pour travailler ensemble à la décoration de votre mariage !
Comme je suis très sympa, je vous ai dégoté plusieurs tutoriaux (voir les liens plus bas) et voici un résumé (je vous le fais avec des lettres en carton car plus simple mais les plus courageux d’entre vous pourront se lancer dans les lettres en métal)
The good news !!!
The good news? It’s not expensive to do! However, it takes a little time and you may not improvised yourself handyman overnight. You do not have to do it yourself, take a ride on Etsy and you can order your letters ready-made for a budget (about $45/letter).
However … your dear husband-to-be wants to invest in the organization of the big day, but choosing the paper invitation or the color of the table runners do not seem to be a big hit on him? It is the ideal project to work on together to decorate your wedding!
As I am a very nice person, I dug out several tutorials (see links below) and summarized the main ideas below (I chose to go with cardboard letters because simpler but the bravest of you will embark letters metal)
 Source : Etsy
MATERIEL & OUTILS NECESSAIRES
{Attention, tous ceux qui en ont fait eux-mêmes, mettent en gardent leurs lecteurs : assurez-vous de savoir utiliser les outils en questions !}
- Équerre
- Perceuse / Visseuse
- Visses
- Ciseaux
- Marteau
- Pince coupante
- Cartons épais pour faire les lettres (ou papier mâché)
- Papier aluminium pour « tapisser » le carton, ou peinture en spray
- Guirlandes (compter une par lettre) à lumière LED avec boitier à piles (pour éviter d’avoir à brancher vos lettres)
- Crayon de papier
PAS-À-PAS
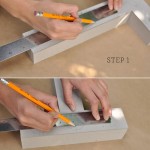
1) Dessiner vos lettres en papier mâché, découper etc.
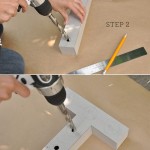
2) Dessiner au crayon de papier où vous souhaiter placer les ampoules des guirlandes. Ne les placer pas trop près l’une de l’autre.
3) En fonction de la taille du câble de votre guirlande, percez à la perceuse des trous là où vous souhaitez placer les ampoules.
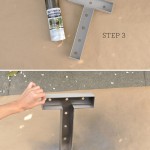
4) Recouvrez de papier alu ou de peinture l’intérieur de vos lettres pour plus de luminosité.
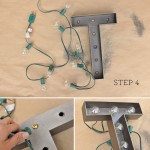
5) Installez vos ampoules ! Attention à bien cacher les fils pour que ça soit plus joli.
Allez-vous tenter cette décoration ? Où allez-vous la placer ? Envoyez-nous des photos !
REQUIRED EQUIPMENT & TOOLS
{Attention: all those who have created these themselves warn their readers: make sure you know how to use the tools in questions!}
- Angle
- Drill / Screwdriver
- Screws and bits
- Scissors
- Hammer
- Cutting Pliers
- Thick Cards for letters (or paper mache)
- Aluminum foil for « wallpaper » cardboard, or spray paint
- Garlands (counting one a letter) with LED lights with battery box (to avoid having to plug your letters in)
- Paper Pencil
STEP-BY-STEP
1) Draw your letters on the cardboard/paper mache, cut and assemble, etc.
2) Draw with a pencil where you want to place the bulbs garlands. Do not place them too close to one another.
3) Depending on the size of the wire from your garland, drill holes where you want to place the bulbs.
4) Cover with aluminum foil or spray paint the inside of your letters for more light or depending on the style you want.
5) Install your bulbs! Be careful to hide the wire for it to be prettier.
How about you? Will you try this decoration? Where will you put it? Send us pictures!
Les liens de {Panpan}
¤
¤
¤
Merci {Panpan}